How To Change Generator Oil Safely? – Step By Step Guide
In this guide, we will provide a step-by-step guide about How To Change Generator Oil safely, also how often should it be changed as well
Changing the old oil from the generator is among the regular maintenance practices that can be adopted to make the generator more reliable and your best companion during long stormy nights. It will make the running process easy, and comfortable, as well as it will lubricate all the vital parts of the engine to run smoothly.
It may seem tedious to start the replacement process but this can be done easily by anyone at home. You will have to keep the manual nearby to get instructions and all the necessary information.
The required information can be desired oil type, oil filter type, the amount required, and the rate at which oil needs to be replaced.
In this article, we will provide a detailed guide on how to change generator oil. The whole process of replacement is simple and consists of basic steps that you can follow properly to get the generator oil changed.
Tools You’ll Need
There are the following things you will need to get first before starting the process of changing generator oil.
Step By Step Guide On How To Change Generator Oil Safely
Before changing the generator oil, the first thing you have to do is to ensure your safety. Make sure that you are wearing protective gear such as goggles or glasses, gloves, and all other materials necessary for your protection.
Then collect all the essential gadgets in one place so you can easily use them whenever needed without searching for them during the process. Below is the step-by-step guide to show you how to change generator oil without any inconvenience.
1. Warm Up The Old Oil:
The first step after ensuring safety is to heat the old oil present in the engine so you can easily and quickly drain it out. The warm oil will be easier to drain as compared to the cold that is already present inside the generator.
To do this, you have to turn on the generator and make it run for a few minutes. After a few minutes, you can turn off the generator as the oil will be hot enough to be drained quickly.
2. Place Generator On Blocks:
After running up the generator for a few minutes to heat the oil, you need to prepare it for draining. Then take similar blocks and place them on an even surface. I’d suggest placing blocks on a table so that you won’t strain your back while bending to do the job.
After deciding where to place blocks, now you can put your generator above those blocks. Also, make sure to leave enough space through which you can drain oil easily. Keep the blocks in a balanced position. You may not want your machine to fall during the process. So, make sure you have kept it in a balanced position.
Placing the generator in the right position can be difficult because some units are heavy in weight and it is not easy for a single person to lift them all alone. For this, you will need some assistance if you want to avoid any injury due to lifting a heavy machine.
3. Remove The Spark Wire:
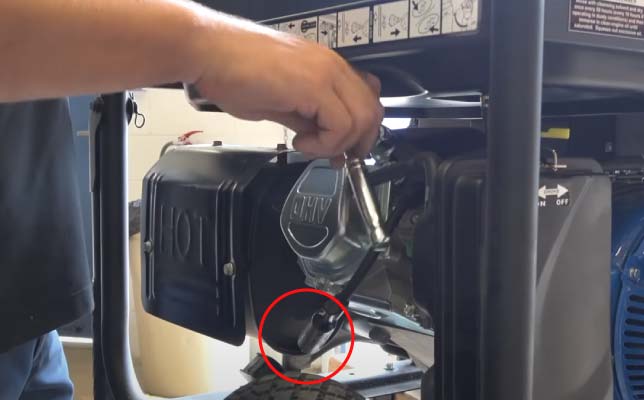
Now you have placed your generator on the right spot of blocks in a balanced position, you should then find the spark plug and unplug it. Be careful while unplugging the spark wire. This is done usually for safety measures as the engine may start accidentally while having a little oil in it.
Some people find it difficult to locate the spark wire as some models are having their spark plug beneath the plastic covers. If you are facing a problem in locating the spark plug, you can get help through the manual. The manual will be helpful to give you easy access to the plug.
Some units have more than one spark plug, so it is very important to get through the manual at least once.
When you find the location of the spark plug then remove the wire from the connection spot. The easy and safe way to do it is to grab the wire boot tightly and curl it up in each direction to pull it off simultaneously.
In this way, you will easily remove the spark plug without corroding it even a little bit. Nowadays, it is easy to unclip the bond from the spark plug and reduce strain on the wire due to the availability of rotating machines.
Note: Do not pull the part of the wire otherwise, it will cause damage.
4. Prepare For Draining The Old Oil:
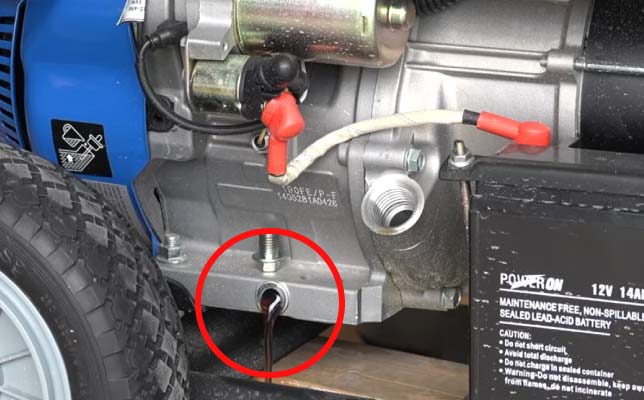
When you are done unplugging the spark wire, find out the plug to drain oil. Usually, the plug is a nut of hexagonal or square shape but this shape varies from model to model. One of the safest ways is to find it by reading the manual carefully.
You will get all the necessary information related to changing oil and oil filters wherever applicable. If the plug or its surrounding parts are stained or dirty, wipe them off to remove residue oil or grime. By doing this you will get clear visibility of the inside.
Make sure to place an oil pan or empty canister beneath the drain plug. It will help to collect all the dirty oil dripping from the generator.
5. Remove The Oil Plug:
When the drain pan has collected all the dripped oil out of the generator, the next step is to remove the oil drain plug. For this purpose, you’ll need a socket or a wrench.
For loosening the plug, you can use a ratchet and unscrew all the remaining threading. But keep in mind, as soon you remove the plug, old oil will start flowing out of the engine simultaneously.
Try your best to collect every ounce of oil dripping through the drain pan and then handle it with care without placing it in trash cans as it can play a part in polluting the soil as well as water. Put it in a place where it can be easily recycled.
6. Replace The Old Oil Filter With The New One:
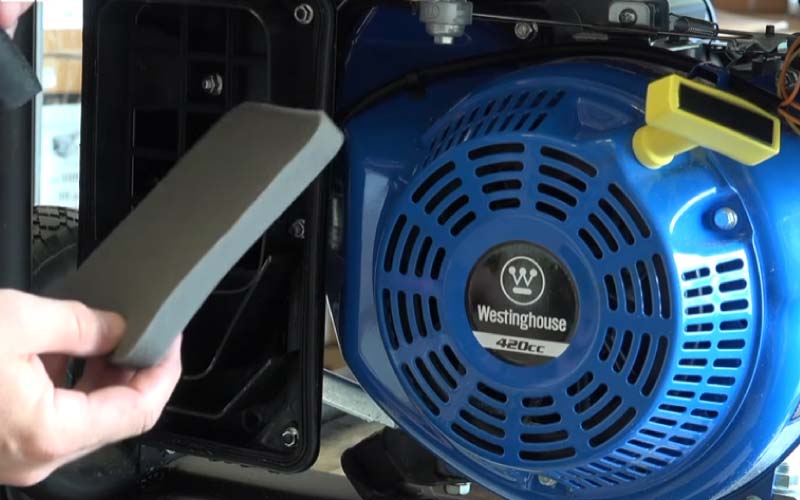
You will also need to replace the old oil filter if there’s one already installed in your generator. Some people avoid doing so to save costs. It will be like running new oil with the help of an old oil filter and it isn’t a wise choice.
It would be better to replace both the old oil as well as old oil filter to enhance the life span of your generator. To do this you will need a high-quality oil filter wrench. You will need to be very careful while dealing with the filter by using a wrench and then slightly loosening it.
Unscrew the remaining parts and remove the wrench after loosening it. Do not forget to wear protective gloves as the oil filter can be hot and a little bit of oil may pour out of the filter.
Clean the sealing of adapters from the oil filter to remove the gasket or any debris if present. Then take your new oil filter and lubricate its gasket with the help of new engine oil. Start fixing it by screwing it in with your hands until the gasket gets into contact with the filter adapter.
In the end, tighten up the filter with the help of pliers or a wrench. Do not overtighten it if the filter is a bit fragile. Also, make sure to dispose of old oil filters and motor oil safely to avoid any contamination.
7. Tighten Up The Plug And Pour New Oil:
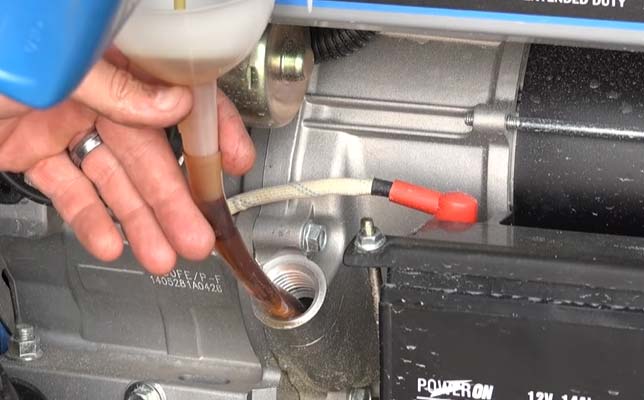
You will need to reinstall the old drain plug at its position after placing the new oil filter. You can screw it and then tighten it with the help of a socket wrench. Then after removing the oil, insert a funnel.
After doing that, start pouring new oil inside the generator. The quantity and type of oil vary for each model and brand. The amount will also depend on the climate and temperature of the region your generator is being used.
When you are done pouring the right amount of oil, take out the funnel and seal the oil fill cap. Always use superb-quality oil as it will protect the engine from wear and tear.
8. Reconnect Spark Plug Wire
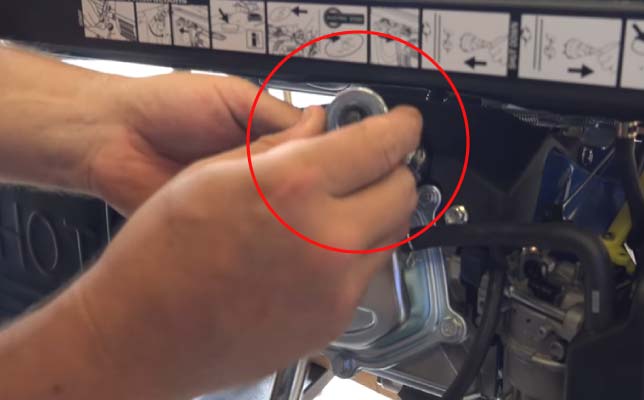
This is the last step of the guide on how to change generator oil. Now take the wire boot slide it over the top of the plug and press it firmly. If the connector will fix in place, you will hear a clicking sound. Then you can place any covers on it after you have done reconnected the plug.
Turn on your generator and make it run for a few minutes. It will clean the oil to move freely through the engine while lubricating it.
Then turn the machine off and observe the level of oil and whether it is within the required range. Otherwise, you can add more oil to take it to the desired level.
By following all steps properly you’ll make your generator a dependable partner to serve you even in the stormy season.
Here is the step by step guide to Break in a Generator
below is the video of HR supply follow this if you are still confused;
How Often Should You Change Generator Oil?
After filling up the generator, you have to change the oil within the first month or first 20 hours of use whichever comes first. So, it is important to change the oil every 6 months and or 100 hours of use.
It is good to change the oil within the first few hours of use because this is the break-in period of a generator. Using a generator within the break-in period will lead to the loosening of metal particles in the engine.
By changing the oil after first use will help to remove those particles before any damage to your generator. After the break-in period, you can change the oil after every six months.
Checkout our guide about How to Connect Generator to House without Transfer Switch
What Kind Of Oil Does Your Generator Need?
But this is not a hard and fast rule for choosing the oil, as its variety varies depending on different circumstances and models.

Josh is a highly skilled electrician with specialized expertise in the field of generators. With years of experience under his belt, he has established himself as an expert in all aspects of generators, ranging from installation and maintenance to troubleshooting and repairs. Josh’s in-depth knowledge of electrical systems and his commitment to staying updated with the latest industry advancements make him a reliable and sought-after professional.
